
How to Deploy your Flutter Apps to PlayStore using Codemagic (part 1)

I am a Software Developer and Technical Writer from Nigeria. I love cats and I love writing
Introduction
Flutter SDK has recently been rated as the most used cross-platform solution, according to Statista in 2021. Flutter has grown even bigger than it was as it not only supports one code-base for your mobile applications but now has support for other platforms like Windows, macOS, and the Web. These features are game-changers for the future of developers.
Goals
In this tutorial, we will build a simple flutter application that fetches data from an API.
We will also look at how to write tests for our flutter app and the process needed to sign our application so it can be ready for publishing to app store.
We will also setup CI/CD for our flutter application to automate deployment to app store.
Setup:
To create a new flutter project for your editor, use the following command
flutter create code-magic-app
Replace the contents of your pubspec.yaml file with:
name: code-magic-app
description: A new Flutter project.
version: 1.0.0+1
publish_to: none

environment:
  sdk: ">=2.16.1 <3.0.0"

dependencies:
  flutter:
    sdk: flutter
  flutter_bloc: ^8.0.1
  equatable: ^2.0.3
  http: ^0.13.4
  url_launcher: ^6.0.20
  flutter_launcher_icons: ^0.9.2

dev_dependencies:
  flutter_test:
    sdk: flutter
  bloc_test: ^9.0.3
  mocktail: ^0.3.0
flutter_icons:
  android: launcher_icon
  ios: true
  image_path: "assets/launchericon_codemagic.png"

flutter:
  uses-material-design: true
Note: We will be using flutter_bloc and equatable for state management in our application.
Next, run flutter pub get to install all the necessary dependencies.
File Structure
├─ lib
│  ├─ home
│  │  ├─ bloc
│  │  │  ├─ authors_bloc.dart
│  │  │  ├─ authors_event.dart
│  │  │  └─ authors_state.dart
│  │  ├─ models
│  │  │  └─ post.dart
│  │  ├─ view
│  │  │  ├─ details.dart
│  │  │  └─ home_page.dart
│  │  └─ widgets
│  │     ├─ bottom_loader.dart
│  │     ├─ details_widget.dart
│  │     └─ post_list_item.dart
│  ├─ app.dart
│  └─ main.dart
├─ test
│  ├─ bloc
│  │  ├─ authors_bloc_.dart
│  │  ├─ authors_event_test.dart
│  │  └─ authors_state_.dart
│  ├─ models
│  └─ view
├─ pubspec.lock
└─ pubspec.yaml
Flutter Basics
We will be learning the few basics about flutter in this section.
Widgets
According to flutter documentation, widgets are an immutable description of part of a user interface.
The app bar on our mobile devices are widgets or the input fields on our devices are all widgets in flutter.
Widgets are rendered based on description and once the description or state is changed, it is rendered by their build function.
Stateful Widgets
A stateful widget is a widget class linked to a state class, when there is a change in state, the widget rebuilds. Stateful widgets are mutable because they can re-render on state change.
Stateless Widgets
Stateless widgets are immutable classes. It can be seen as a static representation where a change in data is not required or needed.
State
State can be described as any data you need to rebuild your user interface at any time.
Building Our Flutter Application
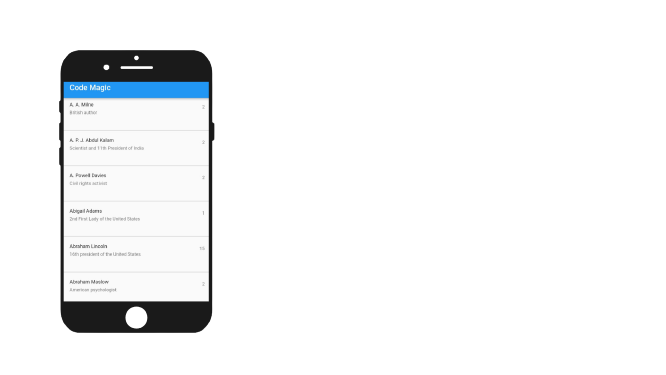
We will be building a simple flutter application that fetches a list of authors from an API. We will display the list of authors and their descriptions using a ListView widget.
When an author is selected, we navigate to a new screen where more detailed information about the author is displayed.
This is what our app should look like
Rest API
For this application, we will be using https://quotable.io/authors as our data source for the list of authors.
We can get the images of each author using the following url but we will be replacing {slug} with the slug property from our list of authors url.
https://images.quotable.dev/profile/400/{slug}.jpg.
You can open these urls on a new tab on your browser to see their response.
Now that we know what our data source is, let’s create models for our API response.
Creating our Models
Why do we need models
When we get responses from an API like you saw when you viewed the list of authors urls, they are returned as raw json. We will be decoding the responses we get from the API to a dart map.
We can populate our app with the map but that means we will have to index the responses every time we want to use them and as the app consumes more API responses, it becomes harder to maintain and this method is error prone.
Creating models has become common practice in flutter development to to create dart classes that model our API responses.
To learn more about models, you can read this.
Create a file called post.dart in our model folder.
import 'package:equatable/equatable.dart';
class Post extends Equatable {
  final String? name;
  final String? bio;
  final String? description;
  final String? id;
  final int? quoteCount;
  final String? link;
  final String? dateAdded;
  final String? dateModified;
  final String? slug;
  const Post(
      {this.name,
      this.link,
      this.slug,
      this.description,
      this.bio,
      this.quoteCount,
      this.id,
      this.dateAdded,
      this.dateModified});
  @override
  List<Object?> get props => [
        name,
        description,
        bio,
        quoteCount,
        id,
        dateModified,
        description,
        dateAdded,
        link,
        slug
      ];
  Map<String, dynamic> toMap() {
    return {
      'name': name,
      'slug': slug,
      'bio': bio,
      'description': description,
      '_id': id,
      'quoteCount': quoteCount,
      'dateAdded': dateAdded,
      'link': link,
      'dateModified': dateModified,
    };
  }
  factory Post.fromMap(Map<String, dynamic> map) {
    return Post(
      name: map['name'] as String?,
      link: map['link'] as String?,
      slug: map['slug'] as String?,
      bio: map['bio'] as String?,
      description: map['description'] as String?,
      id: map['_id'] as String?,
      quoteCount: map['quoteCount'] as int?,
      dateAdded: map['dateAdded'] as String?,
      dateModified: map['dateModified'] as String?,
    );
  }
}
Equatable
If you write dart, you may have come across scenarios where you had to override the == operator and hashCode in order to compare different instances of the same class but we have the equatable package to help us do this comparison so we don’t have to waste time writing so much boiler plate code. Read more here.
In our case, we will be using the equatable package to make comparisons in our model class.
Now that we have created our models, let’s create our state manager.
Understanding BloC Basics
Bloc is a design pattern that was created by google to handle every possible state in our flutter app, it helps separate logic from view and makes our code cleaner and even testable.
A developer called Felix Angelo created a library called BLOC which is being maintained by him. This will help developers implement the google design pattern (BLOC) even easier.
Furthermore, Bloc is an advanced class that relies on events and triggers a state. Read the package for more details.
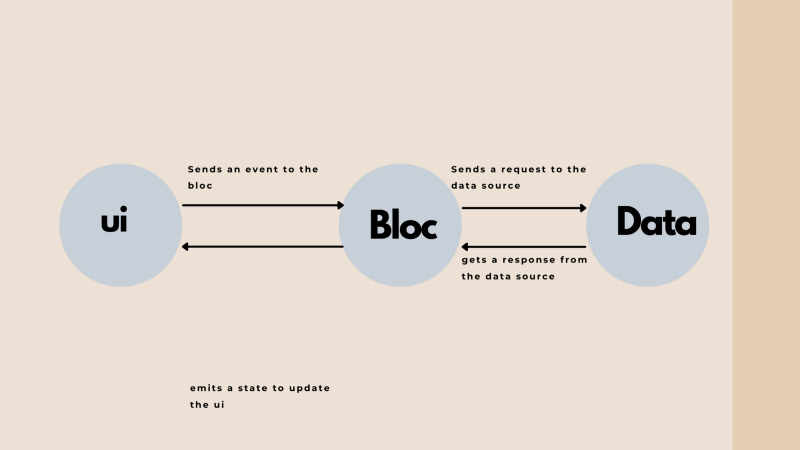
Bloc pattern
Bloc Widgets
We will be talking about two basic widgets we will be using in our project.
BlocBuilder: This widget requires a builder function and a bloc to build its children in response to new states emitted from the bloc.
BlocBuilder<BlocA, BlocAState>(
  builder: (context, state) {
    // return widget here based on BlocA's state
  }
)
BlocProvider: This bloc widget provides a bloc to its children using BlocProvider.of(context). Every child widget gets updated when there is a change in the bloc.
Using State in our Application
Before we dive into implementation, it is necessary that we define what our bloc state manager will do.
AuthorsEvent
All it will do is fetch data from our data source in order for our presentation layer to display it and we can start by creating an Event.
The bloc, which is the middle man, will only respond to a single PostFetched event in our app. The presentation layer will add the PostFetched event whenever it needs a post to present and it is implemented like so.
part of 'authors_bloc.dart';
abstract class AuthorsEvent extends Equatable {
  @override
  List<Object?> get props => [];
}
class PostFetched extends AuthorsEvent {}
Recall that the bloc is dependent on the on the event to trigger a state. Our PostBloc will be receiving PostEvent which will convert to states for our app.
Next, let’s create our state.
AuthorsState
Our presentation layer will need several pieces of information to properly lay itself out.
- AuthorsStatus.initial: This will tell our presentation layer to show a loader while the post is being retrieved from our data source.
- AuthorsStatus.successful: This will tell our presentation layer that the content it was fetching while it was loading has been fetched and is ready to give out.
- AuthorsStatus.failed: This will tell the presentation layer that it had difficulty fetching the data because the server was down or because there was no internet connection.
- Post: This will contain a list of authors to display in our presentation layer.
Note: Bloc has a vscode extension called Bloc that can help create bloc folders, so you do not have to create files every time.
Let us now implement our state as such.
part of 'authors_bloc.dart';
enum AuthorsStatus { initial, successful, failed }
class AuthorsState extends Equatable {
  final AuthorsStatus authorsStatus;
  final List<Post> posts;
  const AuthorsState({
    this.posts = const [],
    this.authorsStatus = AuthorsStatus.initial,
  });
  AuthorsState copyWith({
    AuthorsStatus? authorsStatus,
    List<Post>? posts,
  }) {
    return AuthorsState(
      authorsStatus: authorsStatus ?? this.authorsStatus,
      posts: posts ?? this.posts,
    );
  }
  @override
  String toString() {
    return 'AuthorsState{authorsStatus: $authorsStatus, posts: $posts}';
  }
  @override
  List<Object> get props => [];
}
Now that we have created our state, lets create the bloc for our application
AuthorsBloc
For simplicity, our app will be fetching only data from our data sources like so
import 'dart:async';
import 'dart:convert';
import 'package:bloc/bloc.dart';
import 'package:equatable/equatable.dart';
import 'package:http/http.dart' as http;
import '../models/post.dart';
part 'authors_event.dart';
part 'authors_state.dart';


class AuthorsBloc extends Bloc<AuthorsEvent, AuthorsState> {
  AuthorsBloc({required this.httpClient}) : super(const AuthorsState()) {
    on<PostFetched>(_onPostFetched);
  }
  final http.Client httpClient;
  Future<void> _onPostFetched(
      AuthorsEvent event, Emitter<AuthorsState> emit) async {
    try {
      if (state.authorsStatus == AuthorsStatus.initial) {
        final post = await _fetchPost();
        return emit(state.copyWith(
          authorsStatus: AuthorsStatus.successful,
          posts: List.of(state.posts)..addAll(post),
        ));
      }
    } catch (e) {
      emit(state.copyWith(authorsStatus: AuthorsStatus.failed));
    }
  }
  Future<List<Post>> _fetchPost() async {
    final response = await httpClient.get(
      Uri.parse('https://quotable.io/authors'),
    );
    if (response.statusCode == 200) {
      final body = jsonDecode(response.body);
      final resultJson = body['results'] as List<dynamic>;
      final results = resultJson.map((e) => Post.fromMap(e)).toList();
      return results;
    }
    throw Exception('error fetching posts');
  }
}
Let’s explain whats happening from the above code snippet.
class AuthorsBloc extends Bloc<AuthorsEvent, AuthorsState> {
  AuthorsBloc({required this.httpClient}) : super(const AuthorsState()) {
    on<PostFetched>(_onPostFetched);
  }
  final http.Client httpClient;
  Future<void> _onPostFetched(
      AuthorsEvent event, Emitter<AuthorsState> emit) async {
    try {
      if (state.authorsStatus == AuthorsStatus.initial) {
        final post = await _fetchPost();
        return emit(state.copyWith(
          authorsStatus: AuthorsStatus.successful,
          posts: List.of(state.posts)..addAll(post),
        ));
      }
    } catch (e) {
      emit(state.copyWith(authorsStatus: AuthorsStatus.failed));
    }
  }
Based on the code above, we created an AuthorsBloc class that has a variable httpClient with a type that comes from out http package http.Client that is used to make requests to the internet.
Next is an asynchronous function _onPostFetched that has emits states based on the api requests. It first sets the state to initial and then calls the fetchPost function that makes the api request and it uses the response to emit a new state to the presentation layer and if the post was not fetched successfully, it emits a failed status to the presentation layer.
Future<List<Post>> _fetchPost() async {
    final response = await httpClient.get(
      Uri.parse('https://quotable.io/authors'),
    );
    if (response.statusCode == 200) {
      final body = jsonDecode(response.body);
      final resultJson = body['results'] as List<dynamic>;
      final results = resultJson.map((e) => Post.fromMap(e)).toList();
      return results;
    }
    throw Exception('error fetching posts');
  }
The code block above directly fetches posts from our api and returns it as a response for which we decode and serialise the response and return the value.
Our Presentation Layer
In our main.dart, we should call our function which is the entry point of our app and call the runApp function which renders our root widget. We will also be including a bloc observer that will help us log transitions or any error that occurs with the app.
Next, create an app.dart file and include the following code
void main() {
  BlocOverrides.runZoned(
    () => runApp(App()),
    blocObserver: SimpleBlocObserver(),
  );
}
class SimpleBlocObserver extends BlocObserver {
  @override
  void onTransition(Bloc bloc, Transition transition) {
    super.onTransition(bloc, transition);
    print(transition);
  }
  @override
  void onError(BlocBase bloc, Object error, StackTrace stackTrace) {
    print(error);
    super.onError(bloc, error, stackTrace);
  }
}
The app.dart file is the root of our project
import 'package:flutter/material.dart';
import 'package:flutter_infinite_list/posts/posts.dart';

class App extends MaterialApp {
  App() : super(home: PostsPage());
}
In our PostPage widget, we will use a BlocProvider which will provide a new instance of the bloc to the widgets children (other parts of the widget that need the what data the bloc provides.
When a new bloc instance is created, we add a PostFetched event to the bloc to fetch our data.
It is implemented like so.
class PostsPage extends StatelessWidget {
  const PostsPage({Key? key}) : super(key: key);
  @override
  Widget build(BuildContext context) {
    return Scaffold(
      appBar: AppBar(

        title: const Text('Code Magic')),
      body: BlocProvider(
        create: (_) =>
            AuthorsBloc(httpClient: http.Client())..add(PostFetched()),
        child: const PostsList(),
      ),
    );
  }
}
Next, we want to display our data fetched from the data source and we will display this data using widgets.
In our app, we will be using ListView widget to display our data which is provided by the BlocProvider and the BlocBuilder rebuilds our widget to display the data.
Based on the provided code below, we use a switch case to check for every state (when the data fetched is successful when it fails) so we can determine what we should display to the user.
Furthermore, we displayed this data with a ListView.separated widget which builds according to the length of your data and are by default scrollable. The .separated property creates a divider between other data, so they are not clustered together.
It is implemented like so.
class PostsList extends StatefulWidget {
  const PostsList({Key? key}) : super(key: key);
  @override
  _PostsListState createState() => _PostsListState();
}
class _PostsListState extends State<PostsList> {
  @override
  Widget build(BuildContext context) {
    return BlocBuilder<AuthorsBloc, AuthorsState>(
      builder: (context, state) {
        switch (state.authorsStatus) {
          case AuthorsStatus.failed:
            return const Center(child: Text('failed to fetch posts'));
          case AuthorsStatus.successful:
            if (state.posts.isEmpty) {
              return const Center(child: Text('no posts'));
            }
            return ListView.separated(
              separatorBuilder: (context, index) => const Divider(
                thickness: 2,
              ),
              itemBuilder: (BuildContext context, int index) {
                return PostListItem(post: state.posts[index]);
              },
              itemCount: state.posts.length,
            );
          default:
            return const Center(child: CircularProgressIndicator());
        }
      },
    );
  }
}
Next, we will create PostListItem to display these posts and it is implemented like so using a ListTile widget.
import 'package:flutter/material.dart';
import '../models/post.dart';
import '../view/details.dart';
class PostListItem extends StatelessWidget {
  const PostListItem({Key? key, required this.post}) : super(key: key);
  final Post post;
  @override
  Widget build(BuildContext context) {
    final textTheme = Theme.of(context).textTheme;
    return Material(
      child: ListTile(
        trailing: Text('${post.quoteCount}', style: textTheme.caption),
        title: Text('${post.name}'),
        isThreeLine: true,
        subtitle: Text('${post.description}'),
        dense: true,
        onTap: () {
          Navigator.push(
            context,
            MaterialPageRoute(
              builder: (_) => DetailedPage(
                post: post,
              ),
            ),
          );
        },
      ),
    );
  }
}
Based on the code above, recall that we created a model class called Post to serialise the data that was returned from our data source. With this class, whenever a new instance is created, we can use any data returned from the data source without writing so much code.
Furthermore, for every tile that is being displayed, we want to be able to click on it and navigate to a new screen so we can see more details about the authors we clicked, on a new screen. We can achieve this by using the onTap property of the ListTile widget and call the Navigator widget.
We will be passing a the post object to the new screen so we can display the particular authors details clicked on.
 Navigator.push(
            context,
            MaterialPageRoute(
              builder: (_) => DetailedPage(
                post: post,
              ),
            ),
Create a new screen
This new screen will be displaying a detailed information about the authors when clicked on, in the first screen.
For this screen, we will create a custom widget that will help us take in two parameters which are, a title and a description. In flutter, we are allowed to create our own widgets to meet our needs, it is that flexible.
Custom Widget Implementation
import 'package:flutter/material.dart';
class CustomDetailsWidget extends StatelessWidget {
  const CustomDetailsWidget(
      {Key? key, required this.description, required this.label})
      : super(key: key);
  final String description;
  final String label;
  @override
  Widget build(BuildContext context) {
    return Column(
      children: [
        RichText(
          text: TextSpan(
              text: label,
              style: const TextStyle(color: Colors.black, fontSize: 18),
              children: <TextSpan>[
                TextSpan(
                    text: description,
                    style:
                        const TextStyle(color: Colors.blueAccent, fontSize: 18))
              ]),
        )
      ],
    );
  }
}
Detailed Page Screen
On this page, we will use a Stacked widget to place our picture on our container for a better view, the image will be fetched using a url which has needs a parameter called slug to display a particular picture.
You will see this slug parameter in the response of our data source.
We can achieve this like so.
class DetailedPage extends StatelessWidget {
  DetailedPage({
    Key? key,
    required this.post,
  }) : super(key: key);
  final post;
  @override
  Widget build(BuildContext context) {
    final String _url = '${post.link}';
    void _launchURL() async {
      if (!await launch(_url)) throw 'Could not launch $_url';
    }
    final String authorsImageUrl =
        'https://images.quotable.dev/profile/400/${post.slug}.jpg';
    return BlocProvider(
      create: (_) => AuthorsBloc(httpClient: http.Client()),
      child: Scaffold(
        appBar: AppBar(
          title: const Text('Detailed Page'),
        ),
        body: Container(
            height: MediaQuery.of(context).size.height,
            width: MediaQuery.of(context).size.width,
            margin: const EdgeInsets.only(top: 50),
            color: Colors.transparent,
            child: Stack(
              children: [
                Positioned(
                  top: 100,
                  child: Container(
                      height: MediaQuery.of(context).size.height,
                      width: MediaQuery.of(context).size.width,
                      color: const Color(0xffF5F5F5),
                      child: Column(
                        crossAxisAlignment: CrossAxisAlignment.start,
                        children: [
                          const SizedBox(
                            height: 50,
                          ),
                          CustomDetailsWidget(
                            label: 'Name :',
                            description: '${post.name}',
                          ),
                          const Divider(
                            thickness: 2,
                          ),
                          CustomDetailsWidget(
                            label: 'Quote count :',
                            description: '${post.quoteCount}',
                          ),
                          const Divider(
                            thickness: 2,
                          ),
                          CustomDetailsWidget(
                            label: 'Description :',
                            description: '${post.description}',
                          ),
                          const Divider(
                            thickness: 2,
                          ),
                          CustomDetailsWidget(
                            label: 'Bio :',
                            description: '${post.bio}',
                          ),
                          const Divider(
                            thickness: 2,
                          ),
                          InkWell(
                            onTap: _launchURL,
                            child: CustomDetailsWidget(
                              label: 'Read more :',
                              description: '${post.link}',
                            ),
                          )
                        ],
                      )),
                ),
                Positioned(
                  right: 0,
                  left: 0,
                  child: CircleAvatar(
                    radius: (70),
                    backgroundColor: Colors.white,
                    child: ClipRRect(
                      borderRadius: BorderRadius.circular(50),
                      child: Image.network(
                        authorsImageUrl,
                        loadingBuilder: (BuildContext context, Widget child,
                            ImageChunkEvent? loadingProgress) {
                          if (loadingProgress == null) return child;
                          return Center(
                            child: CircularProgressIndicator(
                              color: Colors.blue,
                              value: loadingProgress.expectedTotalBytes != null
                                  ? loadingProgress.cumulativeBytesLoaded /
                                      loadingProgress.expectedTotalBytes!
                                  : null,
                            ),
                          );
                        },
                      ),
                    ),
                  ),
                ),
              ],
            )),
      ),
    );
  }
}
Based on the code above, we displayed the details of the authors, using our custom widget and an Image.network to display the picture from the internet and we included a loader so when the image is still being fetched, it will show a loader.
We also used a CircleAvatar widget to make our images round.
Writing a Test
Testing is a process a software product has to go through to prove that it does what it is supposed to do.
Every great product out there has gone through one test or the other to confirm that it is performing as expected.
You don’t want to develop an application and when you want to present it to your clients, it begins to misbehave or doesn’t respond in a certain way. No one will want to be associated with a spooky app

. To avoid all these and more, we must write tests for our application.
Types of Tests
There are various types of tests, to list but a few:
- Unit testing: Unit testing involves testing a particular small unit that is interrelated.
- Smoke testing: This test is done to assert that a product or software under testing is ready or steady for further testing.
- Regression testing: This test helps assert that a single change in some components of the app does not break something in other sides of the software. This can make adding new features easy and stress free.
- Integration testing: Integration testing is a phase in software testing where individual software modules are put together and tested as a group.
- Alpha Testing: This test is a validation test before it is being released to the users. This is not usually carried out by the developer but usually the QA team.
- Beta Testing: This test is usually carried out by the end user in real-time environment.
Writing a Unit Test for our BloC component
Writing a flutter test, requires the following dependencies to be installed.
Moctail and BloC_test
Testing is how you programatically tell flutter to double check that the output given by a feature is the same as the expected response received.
We will be testing our Bloc component to see if it is working as expected.
Note: Your test folder should be symmetrical to the component you want to test. Since we want to test the whole bloc, we must have a folder like our bloc and the same files as our real bloc.
Testing our Bloc
In our test, we made calls to an API, but we are going to have to mock the API call as it is necessary that our test does not depend wholly on all dependencies from our app. The mock-up is where the bloc library called MockTail comes into play.
We need to implement our test like this:
class MockClient extends Mock implements http.Client {}
Uri _postsUrl() {
  return Uri.https('quotable.io', '/authors');
}
void main() {
  group('AuthorsBloc', () {
    const mockPosts = [
      Post(
        id: "_id",
        bio: "bio",
        dateAdded: "dateAdded",
        dateModified: "dateModified",
        description: "description",
        name: "slug",
        slug: 'qwerty',
        link: "link",
        quoteCount: 2,
      )
    ];
    late http.Client httpClient;
So first, we will be creating a mock-up of the response we expect from our api. Next, we setup
    setUpAll(() {
          registerFallbackValue(Uri());
        });
        setUp(() {
          httpClient = MockClient();
        });
As the name implies, these are the setup functions that help us instantiate the object our test will be working with. In our case, we are using setUpAll to introduce an isolated dependency into our test so we can use certain functions to make mock api calls. To understand it better, try commenting out the setUpAll function. Run the test and see the results and the fix it provides.
Next, the setUp function helps us instantiate the object our test will work with.
test('initial state is AuthorsState()', () {
      expect(AuthorsBloc(httpClient: httpClient).state, const AuthorsState());
    });
Based on the code above, we just created a new test case with a description of what the test is about.
group('Should tell if a post was fetched', () {
      blocTest<AuthorsBloc, AuthorsState>(
        'emits successful status when http fetches initial posts',
        setUp: () {
          when(() => httpClient.get(any())).thenAnswer((_) async {
            return http.Response(
              '[{"id": "id","description": "Authors description", "name": "name";,"slug": "slug", "link": "link",}]',
              200,
            );
          });
        },
        build: () => AuthorsBloc(httpClient: httpClient),
        act: (bloc) => bloc.add(PostFetched()),
        expect: () => const <AuthorsState>[
          AuthorsState(
            authorsStatus: AuthorsStatus.successful,
            posts: mockPosts,
          )
        ],
        verify: (_) {
          verify(() => httpClient.get(_postsUrl())).called(1);
        },
      );
Based on the code above, the group function only houses a group of tests necessary for the api fetch feature.
- The when function is a stub (a piece of code that is used to stand in for another programming functionality) that stands in for how we would normally call and return a response from our api in the bloc.
- The build function builds a new bloc instance.
- The act function is short for actual. The actual is, data is being added to the bloc but we expect that once this data is added, we want it to emit a successful state and emit the data for display on the presentation layer.
- The verify function is there to check if the api request was made only once.
Hurray!
we successfully built and wrote a test for our app and you did great!.
Conclusion
In this tutorial, we have learned flutter from scratch, built a working application with it, learned how to manage the state using bloc library, and we also learned how to write tests for our app to ensure it works properly.
In the next session, we will be looking at how to publish our first flutter application to playstore as we setup continuous integration and continuous deployment pipelines using Codemagic.
If you have any questions for part 1, please reach out to me or drop a comment.


